如何使用 Github Actions 自動化 UI 測試
開發人員每週花費 4-8 小時 修復錯誤。如果錯誤潛入生產環境,情況只會更糟。修復它需要 5-10 倍 的時間。這就是為什麼 UI 測試對於交付高品質體驗至關重要,但它也可能非常耗時。每次變更後手動執行所有測試太過費力。
您可以自動化您的工作流程,以便在開發人員推送程式碼時觸發測試。測試在背景執行,並在完成時報告結果。這讓您可以自動偵測回歸錯誤。
本章將向您展示如何使用 Github Actions 實作這樣的工作流程。在此過程中,我將指出優化測試運行的各種方法。
持續 UI 測試
程式碼審查是身為開發人員的重要環節。它有助於及早發現錯誤並維持高品質的程式碼。
為了確保提取請求 (PR) 不會破壞生產環境,您通常會提取程式碼並在本機執行測試套件。這會中斷您的工作流程並花費大量時間。透過持續整合 (CI),您可以在無需任何手動干預的情況下獲得測試的所有好處。
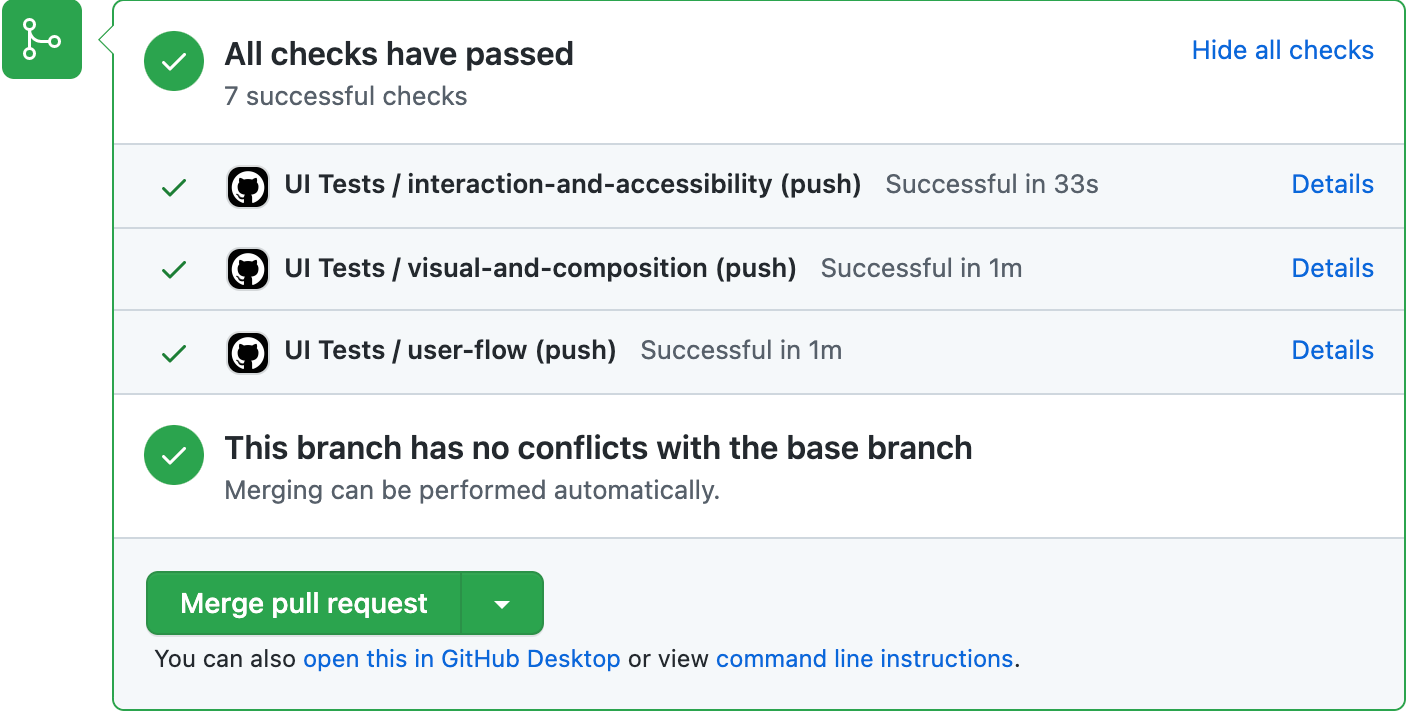
您可以調整 UI、建立新功能或更新依賴項。當您開啟提取請求時,CI 伺服器將自動執行全面的 UI 測試——視覺、組合、無障礙功能、互動和使用者流程。
您將透過 PR 徽章取得測試結果,其中提供所有檢查的摘要。
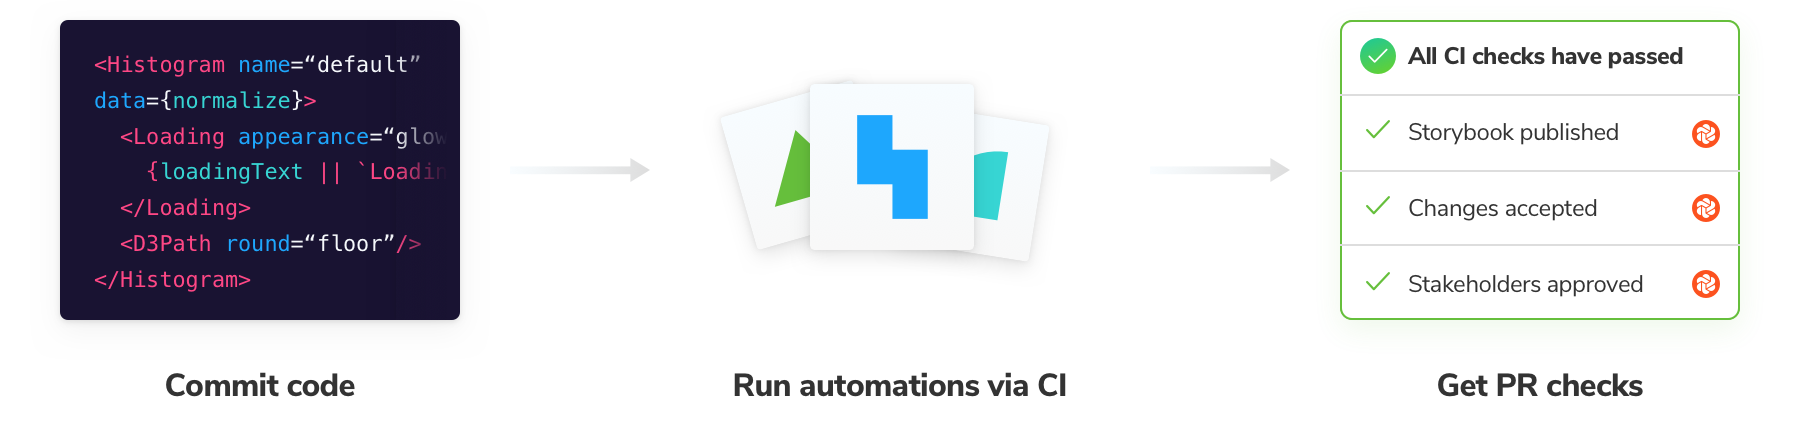
只要看一眼,您就可以判斷提取請求是否通過所有品質檢查。如果是,請繼續審查實際程式碼。如果不是,請深入研究日誌以找出問題所在。
「測試讓我對自動化依賴項更新充滿信心。如果測試通過,我們就會合併它們。」
— Simon Taggart,Twilio 首席工程師
教學
前五章示範了如何測試 Taskbox UI 的各個方面。在此基礎上,我們將使用 GitHub Actions 設定持續整合。
設定 CI
在您的儲存庫中建立一個 .github/workflows/ui-tests.yml 檔案以開始使用。 工作流程 是您想要自動化的一組 任務。它由 事件 觸發,例如推送提交或建立提取請求。
我們的 workflow 將在程式碼被推送到我們儲存庫的任何分支時執行,並且它將有三個任務
- 使用 Storybook 測試執行器執行互動和無障礙功能測試
- 使用 Chromatic 執行視覺和組合測試
- 使用 Cypress 執行使用者流程測試
# .github/workflows/ui-tests.yml

name: 'UI Tests'

on: push

jobs:
  # Run interaction and accessibility tests
  interaction-and-accessibility:
    runs-on: ubuntu-latest
    steps:
      - uses: actions/checkout@v4
        with:
          fetch-depth: 0
      - uses: actions/setup-node@v4
        with:
          node-version: 20
      - name: Install dependencies
        run: yarn
      - name: Install Playwright
        run: npx playwright install --with-deps
      - name: Build Storybook
        run: yarn build-storybook --quiet
      - name: Serve Storybook and run tests
        run: |
          npx concurrently -k -s first -n "SB,TEST" -c "magenta,blue" \
            "npx http-server storybook-static --port 6006 --silent" \
            "npx wait-on tcp:6006 && yarn test-storybook"
  # Run visual and composition tests with Chromatic
  visual-and-composition:
    runs-on: ubuntu-latest
    steps:
      - uses: actions/checkout@v4
        with:
          fetch-depth: 0 # Required to retrieve Git history
      - name: Install dependencies
        run: yarn
      - name: Publish to Chromatic
        uses: chromaui/action@latest
        with:
          # Grab this from the Chromatic manage page
          projectToken: ${{ secrets.CHROMATIC_PROJECT_TOKEN }}
  # Run user flow tests with Cypress
  user-flow:
    runs-on: ubuntu-latest
    steps:
      - uses: actions/checkout@v4
        with:
          fetch-depth: 0
      - name: Install dependencies
        run: yarn
      - name: Cypress run
        uses: cypress-io/github-action@v6
        with:
          start: npm run dev
這裡有幾件事需要注意。對於測試執行器,我們結合使用了 concurrently、http-server 和 wait-on 函式庫來建置和提供 Storybook 以針對其執行測試。
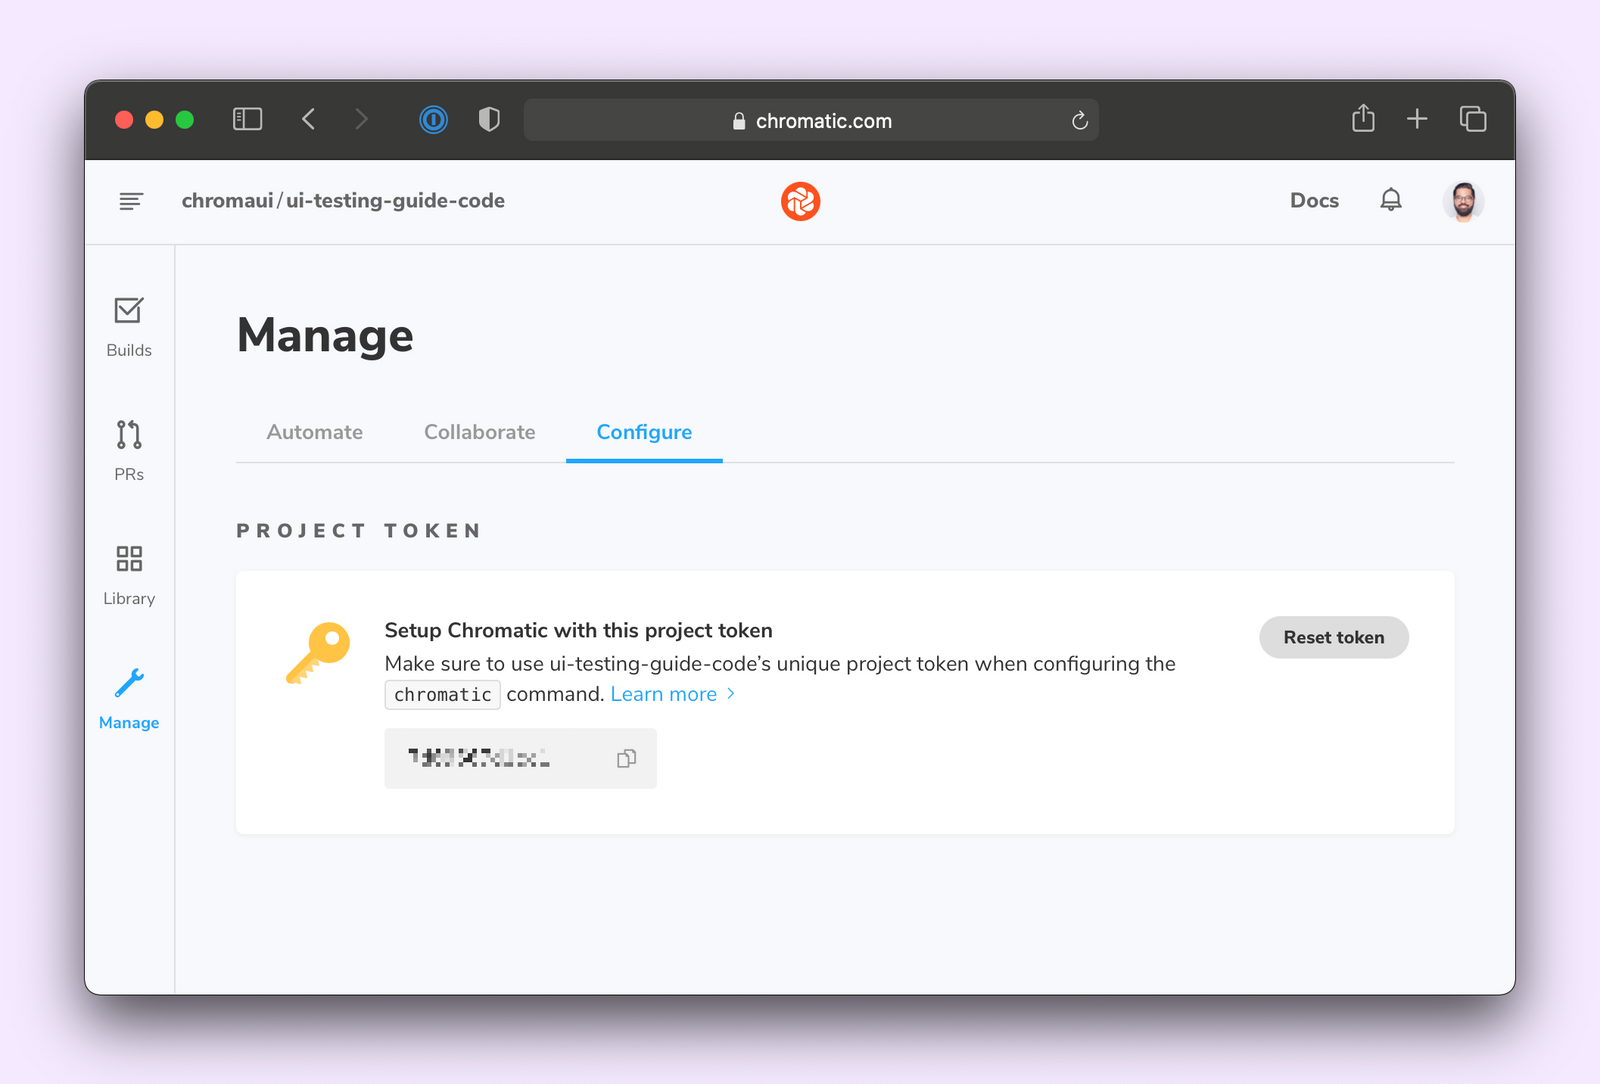
並且為了運行 Chromatic,您需要 CHROMATIC_PROJECT_TOKEN。您可以從 Chromatic 管理頁面取得它,並 新增它 到您的儲存庫機密資訊中。

最後,建立一個新的提交,將您的變更推送到 GitHub,您應該會看到您的工作流程正在運作!

快取依賴項
每個任務都是獨立運行的,這表示 CI 伺服器必須在所有三個任務中安裝依賴項。這會減慢測試運行速度。我們可以快取依賴項,並且僅在鎖定檔案變更時才運行 yarn install 以避免這種情況。讓我們更新工作流程以包含 install-cache 任務。
# .github/workflows/ui-tests.yml

name: 'UI Tests'

on: push

jobs:
  # Install and cache npm dependencies
  install-cache:
    runs-on: ubuntu-latest
    steps:
      - name: Checkout Commit
        uses: actions/checkout@v4
      - name: Cache Yarn dependencies and Cypress
        uses: actions/cache@v4
        id: yarn-cache
        with:
          path: |
            ~/.cache/Cypress
            node_modules
          key: ${{ runner.os }}-yarn-v1-${{ hashFiles('**/yarn.lock') }}
          restore-keys: |
            ${{ runner.os }}-yarn-v1
      - name: Install dependencies if cache invalid
        if: steps.yarn-cache.outputs.cache-hit != 'true'
        run: yarn
  # Run interaction and accessibility tests
  interaction-and-accessibility:
    runs-on: ubuntu-latest
    needs: install-cache
    steps:
      - uses: actions/checkout@v4
        with:
          fetch-depth: 0
      - uses: actions/setup-node@v4
        with:
          node-version: 20
      - name: Restore Yarn dependencies
        uses: actions/cache@v4
        id: yarn-cache
        with:
          path: |
            ~/.cache/Cypress
            node_modules
          key: ${{ runner.os }}-yarn-v1-${{ hashFiles('**/yarn.lock') }}
          restore-keys: |
            ${{ runner.os }}-yarn-v1
      - name: Install Playwright
        run: npx playwright install --with-deps
      - name: Build Storybook
        run: yarn build-storybook --quiet
      - name: Serve Storybook and run tests
        run: |
          npx concurrently -k -s first -n "SB,TEST" -c "magenta,blue" \
            "npx http-server storybook-static --port 6006 --silent" \
            "npx wait-on tcp:6006 && yarn test-storybook"
  # Run visual and composition tests with Chromatic
  visual-and-composition:
    runs-on: ubuntu-latest
    needs: install-cache
    steps:
      - uses: actions/checkout@v4
        with:
          fetch-depth: 0 # Required to retrieve Git history
      - name: Restore Yarn dependencies
        uses: actions/cache@v4
        id: yarn-cache
        with:
          path: |
            ~/.cache/Cypress
            node_modules
          key: ${{ runner.os }}-yarn-v1-${{ hashFiles('**/yarn.lock') }}
          restore-keys: |
            ${{ runner.os }}-yarn-v1
      - name: Publish to Chromatic
        uses: chromaui/action@latest
        with:
          # Grab this from the Chromatic manage page
          projectToken: ${{ secrets.CHROMATIC_PROJECT_TOKEN }}
  # Run user flow tests with Cypress
  user-flow:
    runs-on: ubuntu-latest
    needs: install-cache
    steps:
      - uses: actions/checkout@v4
        with:
          fetch-depth: 0
      - name: Restore Yarn dependencies
        uses: actions/cache@v4
        id: yarn-cache
        with:
          path: |
            ~/.cache/Cypress
            node_modules
          key: ${{ runner.os }}-yarn-v1-${{ hashFiles('**/yarn.lock') }}
          restore-keys: |
            ${{ runner.os }}-yarn-v1
      - name: Cypress run
        uses: cypress-io/github-action@v6
        with:
          start: npm run dev
我們還調整了其他三個任務,使其等待 install-cache 任務完成,以使用快取的依賴項。推送另一個提交以重新運行工作流程。
成功!您已自動化您的測試工作流程。當您開啟 PR 時,它將並行運行測試執行器、Chromatic 和 Cypress,並在 PR 頁面上顯示結果。
掌握 UI 測試工作流程
測試工作流程首先使用 Storybook 隔離元件。然後在您編寫程式碼時執行檢查以獲得更快的反饋迴圈。最後,使用持續整合執行您的整個測試套件。
第 8 章說明了這個完整工作流程的實際運作。我們將了解如何在將新功能發佈到生產環境之前對其進行測試。