
元件測試
當您建立更複雜的 UI(例如頁面)時,元件不僅僅負責渲染 UI。它們還會提取資料並管理狀態。元件測試可讓您驗證 UI 的這些功能方面。
簡而言之,您首先提供元件初始狀態的適當 props。然後模擬使用者行為,例如點擊和表單輸入。最後,檢查 UI 和元件狀態是否正確更新。
在 Storybook 中,這個熟悉的流程發生在您的瀏覽器中。這樣可以更輕鬆地偵錯錯誤,因為您在與開發元件相同的環境(瀏覽器)中執行測試。
Storybook 中的元件測試如何運作?
您首先撰寫 story 來設定元件的初始狀態。然後使用 play 函式模擬使用者行為。最後,使用 test-runner 確認元件正確渲染,以及使用 play 函式的元件測試通過。測試執行器可以透過命令列或在 CI 中執行。
play函式是一小段程式碼,會在 story 完成渲染後執行。您可以使用它來測試使用者工作流程。- 測試是使用 Storybook 工具化的 Vitest 和 Testing Library 版本撰寫,這些版本來自
@storybook/test套件。 @storybook/addon-interactions會在 Storybook 中視覺化測試,並提供回放介面以方便基於瀏覽器的偵錯。@storybook/test-runner是一個獨立的實用程式 (由 Jest 和 Playwright 提供支援),它會執行所有互動測試並捕捉損壞的 stories。- 實驗性的 Vitest 外掛程式也可用,它會將您的 stories 轉換為 Vitest 測試並在瀏覽器中執行它們。
設定互動附加元件
若要使用 Storybook 啟用完整的元件測試體驗,您需要採取額外步驟才能正確設定。我們建議您先閱讀測試執行器文件,再繼續進行其餘必要的設定。
執行下列命令以安裝互動附加元件和相關相依性。
npm install @storybook/test @storybook/addon-interactions --save-dev更新您的 Storybook 設定 (在 .storybook/main.js|ts 中) 以包含互動附加元件。
// Replace your-framework with the framework you are using (e.g., react-webpack5, vue3-vite)
import type { StorybookConfig } from '@storybook/your-framework';

const config: StorybookConfig = {
  framework: '@storybook/your-framework',
  stories: ['../src/**/*.mdx', '../src/**/*.stories.@(js|jsx|mjs|ts|tsx)'],
  addons: [
    // Other Storybook addons
    '@storybook/addon-interactions', // 👈 Register the addon
  ],
};

export default config;
撰寫元件測試
測試本身是在連線到 story 的 play 函式內定義。以下範例說明如何使用 Storybook 和 play 函式設定元件測試
import type { Meta, StoryObj } from '@storybook/react';

import { userEvent, within, expect } from '@storybook/test';

import { LoginForm } from './LoginForm';

const meta: Meta<typeof LoginForm> = {
  component: LoginForm,
};

export default meta;
type Story = StoryObj<typeof LoginForm>;

export const EmptyForm: Story = {};

/*
 * See https://storybook.dev.org.tw/docs/writing-stories/play-function#working-with-the-canvas
 * to learn more about using the canvasElement to query the DOM
 */
export const FilledForm: Story = {
  play: async ({ canvasElement }) => {
    const canvas = within(canvasElement);

    // 👇 Simulate interactions with the component
    await userEvent.type(canvas.getByTestId('email'), 'email@provider.com');

    await userEvent.type(canvas.getByTestId('password'), 'a-random-password');

    // See https://storybook.dev.org.tw/docs/essentials/actions#automatically-matching-args to learn how to setup logging in the Actions panel
    await userEvent.click(canvas.getByRole('button'));

    // 👇 Assert DOM structure
    await expect(
      canvas.getByText(
        'Everything is perfect. Your account is ready and we should probably get you started!',
      ),
    ).toBeInTheDocument();
  },
};
一旦 story 在 UI 中載入,它會模擬使用者的行為並驗證基礎邏輯。
在元件渲染之前執行程式碼
您可以使用 play 方法中的 mount 函式,在渲染之前執行程式碼。
這是一個使用 mockdate 套件來模擬 Date 的範例,這是一種使您的 Story 以一致狀態渲染的有用方法。
import MockDate from 'mockdate';

// ...rest of story file

export const ChristmasUI: Story = {
  async play({ mount }) {
    MockDate.set('2024-12-25');
    // 👇 Render the component with the mocked date
    await mount();
    // ...rest of test
  },
};使用 mount 函式有兩個要求
- 您必須從
context解構 mount 屬性(傳遞給您的 play 函式的參數)。這確保了 Storybook 不會在 play 函式開始之前開始渲染 story。 - 您的 Storybook 框架或建構工具必須設定為轉譯為 ES2017 或更新版本。這是因為解構陳述式和 async/await 用法會被轉譯掉,這會阻止 Storybook 識別您對
mount的使用。
在渲染之前建立模擬資料
您也可以使用 mount 來建立要傳遞給元件的模擬資料。為此,首先在 play 函式中建立您的資料,然後使用配置了該資料的元件呼叫 mount 函式。在此範例中,我們建立一個模擬的 note 並將其 id 傳遞給 Page 元件,我們使用它來呼叫 mount。
export const Default: Story = {
  play: async ({ mount, args }) => {
    const note = await db.note.create({
      data: { title: 'Mount inside of play' },
    });

    const canvas = await mount(
      // 👇 Pass data that is created inside of the play function to the component
      //   For example, a just-generated UUID
      <Page {...args} params={{ id: String(note.id) }} />
    );

    await userEvent.click(await canvas.findByRole('menuitem', { name: /login to add/i }));
  },
  argTypes: {
    // 👇 Make the params prop un-controllable, as the value is always overriden in the play function.
    params: { control: { disable: true } },
  }
};在檔案中的每個 story 之前執行程式碼
有時候您可能需要在檔案中的每個 story 之前執行相同的程式碼。例如,您可能需要設定元件或模組的初始狀態。您可以透過將非同步 beforeEach 函式新增至元件 meta 來執行此操作。
您可以從 beforeEach 函式傳回一個清除函式,該函式將在每個 story 之後執行,當 story 重新掛載或導航離開時。
一般來說,您應該在預覽檔案的 beforeAll 或 beforeEach 函式中重設元件和模組狀態,以確保它適用於您的整個專案。但是,如果元件的需求特別獨特,您可以在元件 meta beforeEach 中使用傳回的清除函式來根據需要重設狀態。
// Replace your-renderer with the name of your renderer (e.g. react, vue3)
import type { Meta, StoryObj } from '@storybook/your-renderer';
import MockDate from 'mockdate';

// 👇 Must include the `.mock` portion of filename to have mocks typed correctly
import { getUserFromSession } from '#api/session.mock';
import { Page } from './Page';

const meta: Meta<typeof Page> = {
  component: Page,
  // 👇 Set the value of Date for every story in the file
  async beforeEach() {
    MockDate.set('2024-02-14');

    // 👇 Reset the Date after each story
    return () => {
      MockDate.reset();
    };
  },
};
export default meta;

type Story = StoryObj<typeof Page>;

export const Default: Story = {
  async play({ canvasElement }) {
    // ... This will run with the mocked Date
  },
};
為所有測試設定或重設狀態
當您變更元件的狀態時,在渲染另一個 story 之前重設該狀態非常重要,以維持測試之間的隔離。
有兩個選項可以重設狀態:beforeAll 和 beforeEach。
beforeAll
預覽檔案 (.storybook/preview.js|ts) 中的 beforeAll 函式將在專案中的任何 story 之前執行一次,並且不會在 story 之間重新執行。除了在開始測試執行時的初始執行之外,除非預覽檔案更新,否則它不會再次執行。這是一個啟動您的專案或執行整個專案所依賴的任何設定的好地方,如下例所示。
您可以從 beforeAll 函式傳回一個清除函式,該函式將在重新執行 beforeAll 函式或在測試執行器中的拆卸過程中執行。
// Replace your-renderer with the renderer you are using (e.g., react, vue3, angular, etc.)
import { Preview } from '@storybook/your-renderer';

import { init } from '../project-bootstrap';

const preview: Preview = {
  async beforeAll() {
    await init();
  },
};

export default preview;
beforeEach
與只執行一次的 beforeAll 不同,預覽檔案 (.storybook/preview.js|ts) 中的 beforeEach 函式將在專案中的每個 story 之前執行。這最適合用於重設所有或大多數 story 使用的狀態或模組。在下面的範例中,我們使用它來重設模擬的 Date。
您可以從 beforeEach 函式傳回一個清除函式,該函式將在每個 story 之後執行,當 story 重新掛載或導航離開時。
// Replace your-renderer with the renderer you are using (e.g., react, vue3, angular, etc.)
import { Preview } from '@storybook/your-renderer';
import MockDate from 'mockdate';

const preview: Preview = {
  async beforeEach() {
    MockDate.reset()
  }
};

export default preview;不需要還原 fn() 模擬,因為 Storybook 會在渲染 story 之前自動執行此操作。請參閱parameters.test.restoreMocks API 以取得更多資訊。
使用者事件的 API
在幕後,Storybook 的 @storybook/test 套件提供了 Testing Library 的 user-events API。如果您熟悉 Testing Library,您應該在 Storybook 中感到賓至如歸。
以下是 user-event 的簡略 API。如需更多資訊,請查看官方 user-event 文件。
| 使用者事件 | 描述 |
|---|---|
clear | 選取輸入或文字區域內的文字並刪除它userEvent.clear(await within(canvasElement).getByRole('myinput')); |
click | 點擊元素,呼叫 click() 函式userEvent.click(await within(canvasElement).getByText('mycheckbox')); |
dblClick | 點擊元素兩次userEvent.dblClick(await within(canvasElement).getByText('mycheckbox')); |
deselectOptions | 從 select 元素的特定選項中移除選取userEvent.deselectOptions(await within(canvasElement).getByRole('listbox'),'1'); |
hover | 將滑鼠停留在元素上userEvent.hover(await within(canvasElement).getByTestId('example-test')); |
keyboard | 模擬鍵盤事件userEvent.keyboard(‘foo’); |
selectOptions | 選取 select 元素的指定選項或多個選項userEvent.selectOptions(await within(canvasElement).getByRole('listbox'),['1','2']); |
type | 在輸入或文字區域內寫入文字userEvent.type(await within(canvasElement).getByRole('my-input'),'Some text'); |
unhover | 將滑鼠移出元素userEvent.unhover(await within(canvasElement).getByLabelText(/Example/i)); |
使用 Vitest 的 API 斷言測試
Storybook 的 @storybook/test 也提供了來自 Vitest 的 API,例如 expect 和 vi.fn。這些 API 改善了您的測試體驗,協助您斷言是否已呼叫函式、DOM 中是否存在元素等等。如果您習慣使用 Jest 或 Vitest 等測試套件的 expect,則可以使用幾乎相同的方式編寫元件測試。
// Replace your-framework with the name of your framework
import type { Meta, StoryObj } from '@storybook/your-framework';
import { userEvent, waitFor, within, expect, fn } from '@storybook/test';
import { Form } from './Form';
const meta: Meta<typeof Form> = {
component: Form,
args: {
// 👇 Use `fn` to spy on the onSubmit arg
onSubmit: fn(),
},
};
export default meta;
type Story = StoryObj<typeof Form>;
/*
* See https://storybook.dev.org.tw/docs/writing-stories/play-function#working-with-the-canvas
* to learn more about using the canvasElement to query the DOM
*/
export const Submitted: Story = {
play: async ({ args, canvasElement, step }) => {
const canvas = within(canvasElement);
await step('Enter credentials', async () => {
await userEvent.type(canvas.getByTestId('email'), 'hi@example.com');
await userEvent.type(canvas.getByTestId('password'), 'supersecret');
});
await step('Submit form', async () => {
await userEvent.click(canvas.getByRole('button'));
});
// 👇 Now we can assert that the onSubmit arg was called
await waitFor(() => expect(args.onSubmit).toHaveBeenCalled());
},
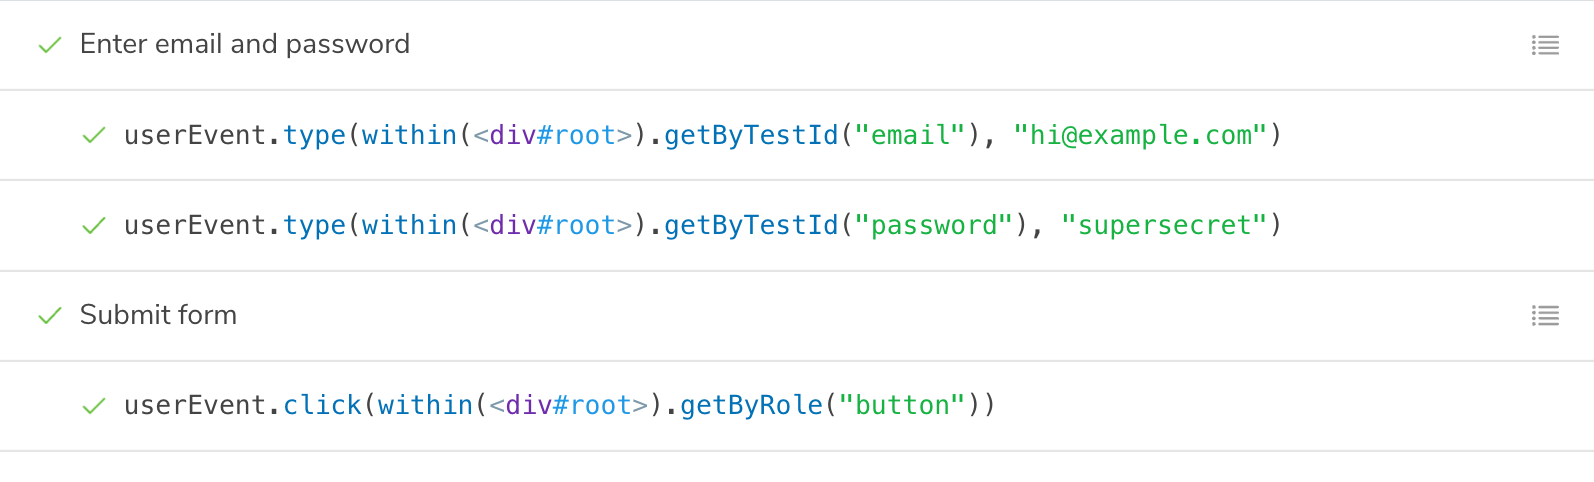
};使用 step 函式分組互動
對於複雜的流程,使用 step 函式將相關互動組合在一起會很有幫助。這讓您可以提供一個自訂標籤來描述一組互動。
// Replace your-framework with the name of your framework
import type { Meta, StoryObj } from '@storybook/your-framework';

import { userEvent, within } from '@storybook/test';

import { MyComponent } from './MyComponent';

const meta: Meta<typeof MyComponent> = {
  component: MyComponent,
};

export default meta;
type Story = StoryObj<typeof MyComponent>;

/*
 * See https://storybook.dev.org.tw/docs/writing-stories/play-function#working-with-the-canvas
 * to learn more about using the canvasElement to query the DOM
 */
export const Submitted: Story = {
  play: async ({ args, canvasElement, step }) => {
    const canvas = within(canvasElement);

    await step('Enter email and password', async () => {
      await userEvent.type(canvas.getByTestId('email'), 'hi@example.com');
      await userEvent.type(canvas.getByTestId('password'), 'supersecret');
    });

    await step('Submit form', async () => {
      await userEvent.click(canvas.getByRole('button'));
    });
  },
};
這會將您的互動顯示在可摺疊的群組中。
模擬模組
如果您的元件依賴於匯入元件檔案中的模組,您可以模擬這些模組來控制並斷言它們的行為。詳細資訊請參閱模擬模組指南。
然後,您可以將模擬的模組(其中包含 Vitest 模擬函式的所有實用方法)匯入到您的 Story 中,並使用它來斷言元件的行為。
// Replace your-renderer with the name of your renderer (e.g. react, vue3)
import type { Meta, StoryObj } from '@storybook/your-renderer';
import { expect, userEvent, within } from '@storybook/test';
// 👇 Must include the `.mock` portion of filename to have mocks typed correctly
import { saveNote } from '#app/actions.mock';
import { createNotes } from '#mocks/notes';
import NoteUI from './note-ui';
const meta: Meta<typeof NoteUI> = {
title: 'Mocked/NoteUI',
component: NoteUI,
};
export default meta;
type Story = StoryObj<typeof NoteUI>;
const notes = createNotes();
export const SaveFlow: Story = {
name: 'Save Flow ▶',
args: {
isEditing: true,
note: notes[0],
},
play: async ({ canvasElement, step }) => {
const canvas = within(canvasElement);
const saveButton = canvas.getByRole('menuitem', { name: /done/i });
await userEvent.click(saveButton);
// 👇 This is the mock function, so you can assert its behavior
await expect(saveNote).toHaveBeenCalled();
},
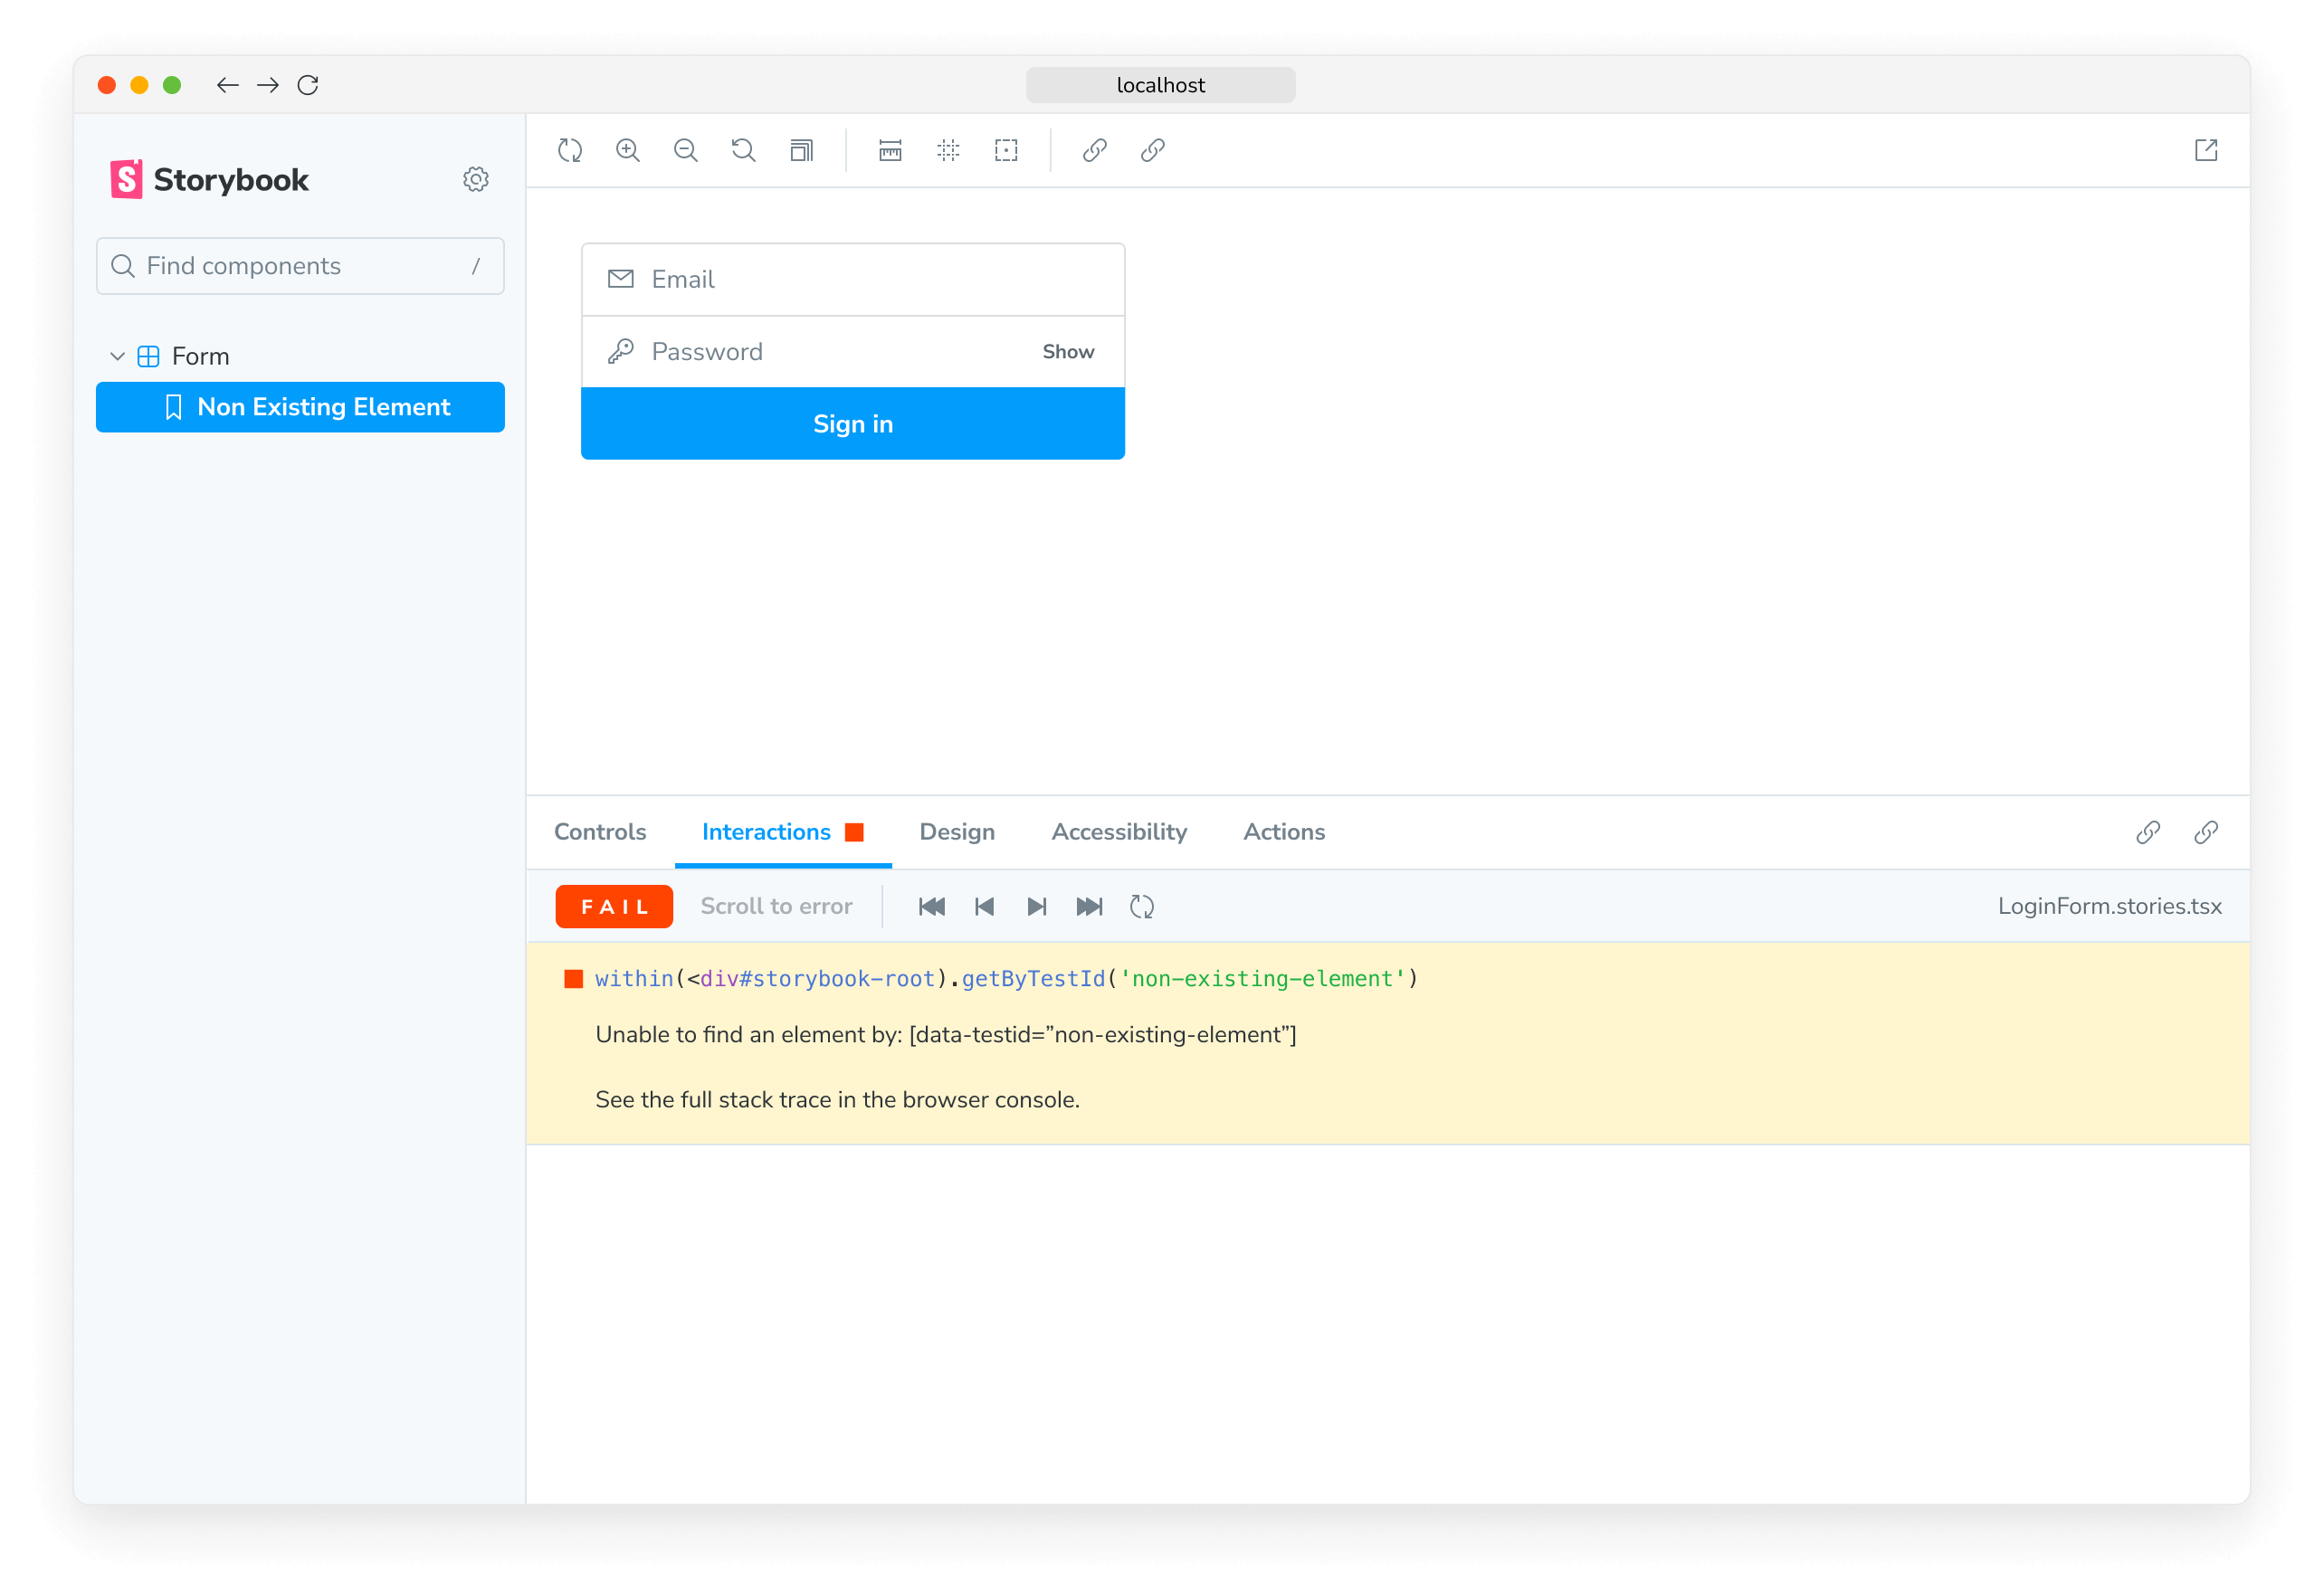
};互動式除錯器
如果您查看互動面板,您會看到逐步流程。它還提供了一組方便的 UI 控制項,可暫停、繼續、倒帶以及逐步執行每個互動。
用於重現的永久連結
在 Story 渲染後,會執行 play 函式。如果發生錯誤,它會顯示在互動附加元件面板中,以協助進行除錯。
由於 Storybook 是一個 Web 應用程式,因此任何擁有 URL 的人都可以重現錯誤,並獲得相同的詳細資訊,而無需任何額外的環境設定或工具。
透過在提取請求中自動發佈 Storybook,進一步簡化元件測試。這為團隊提供了一個通用的參考點來測試和除錯 Story。
使用測試執行器執行測試
Storybook 僅在您檢視 Story 時才會執行元件測試。因此,您必須逐一瀏覽每個 Story 才能執行所有檢查。隨著您的 Storybook 成長,手動檢閱每個變更變得不切實際。Storybook 測試執行器會為您自動執行所有測試來自動化此流程。要執行測試執行器,請開啟一個新的終端機視窗並執行以下命令
npm run test-storybook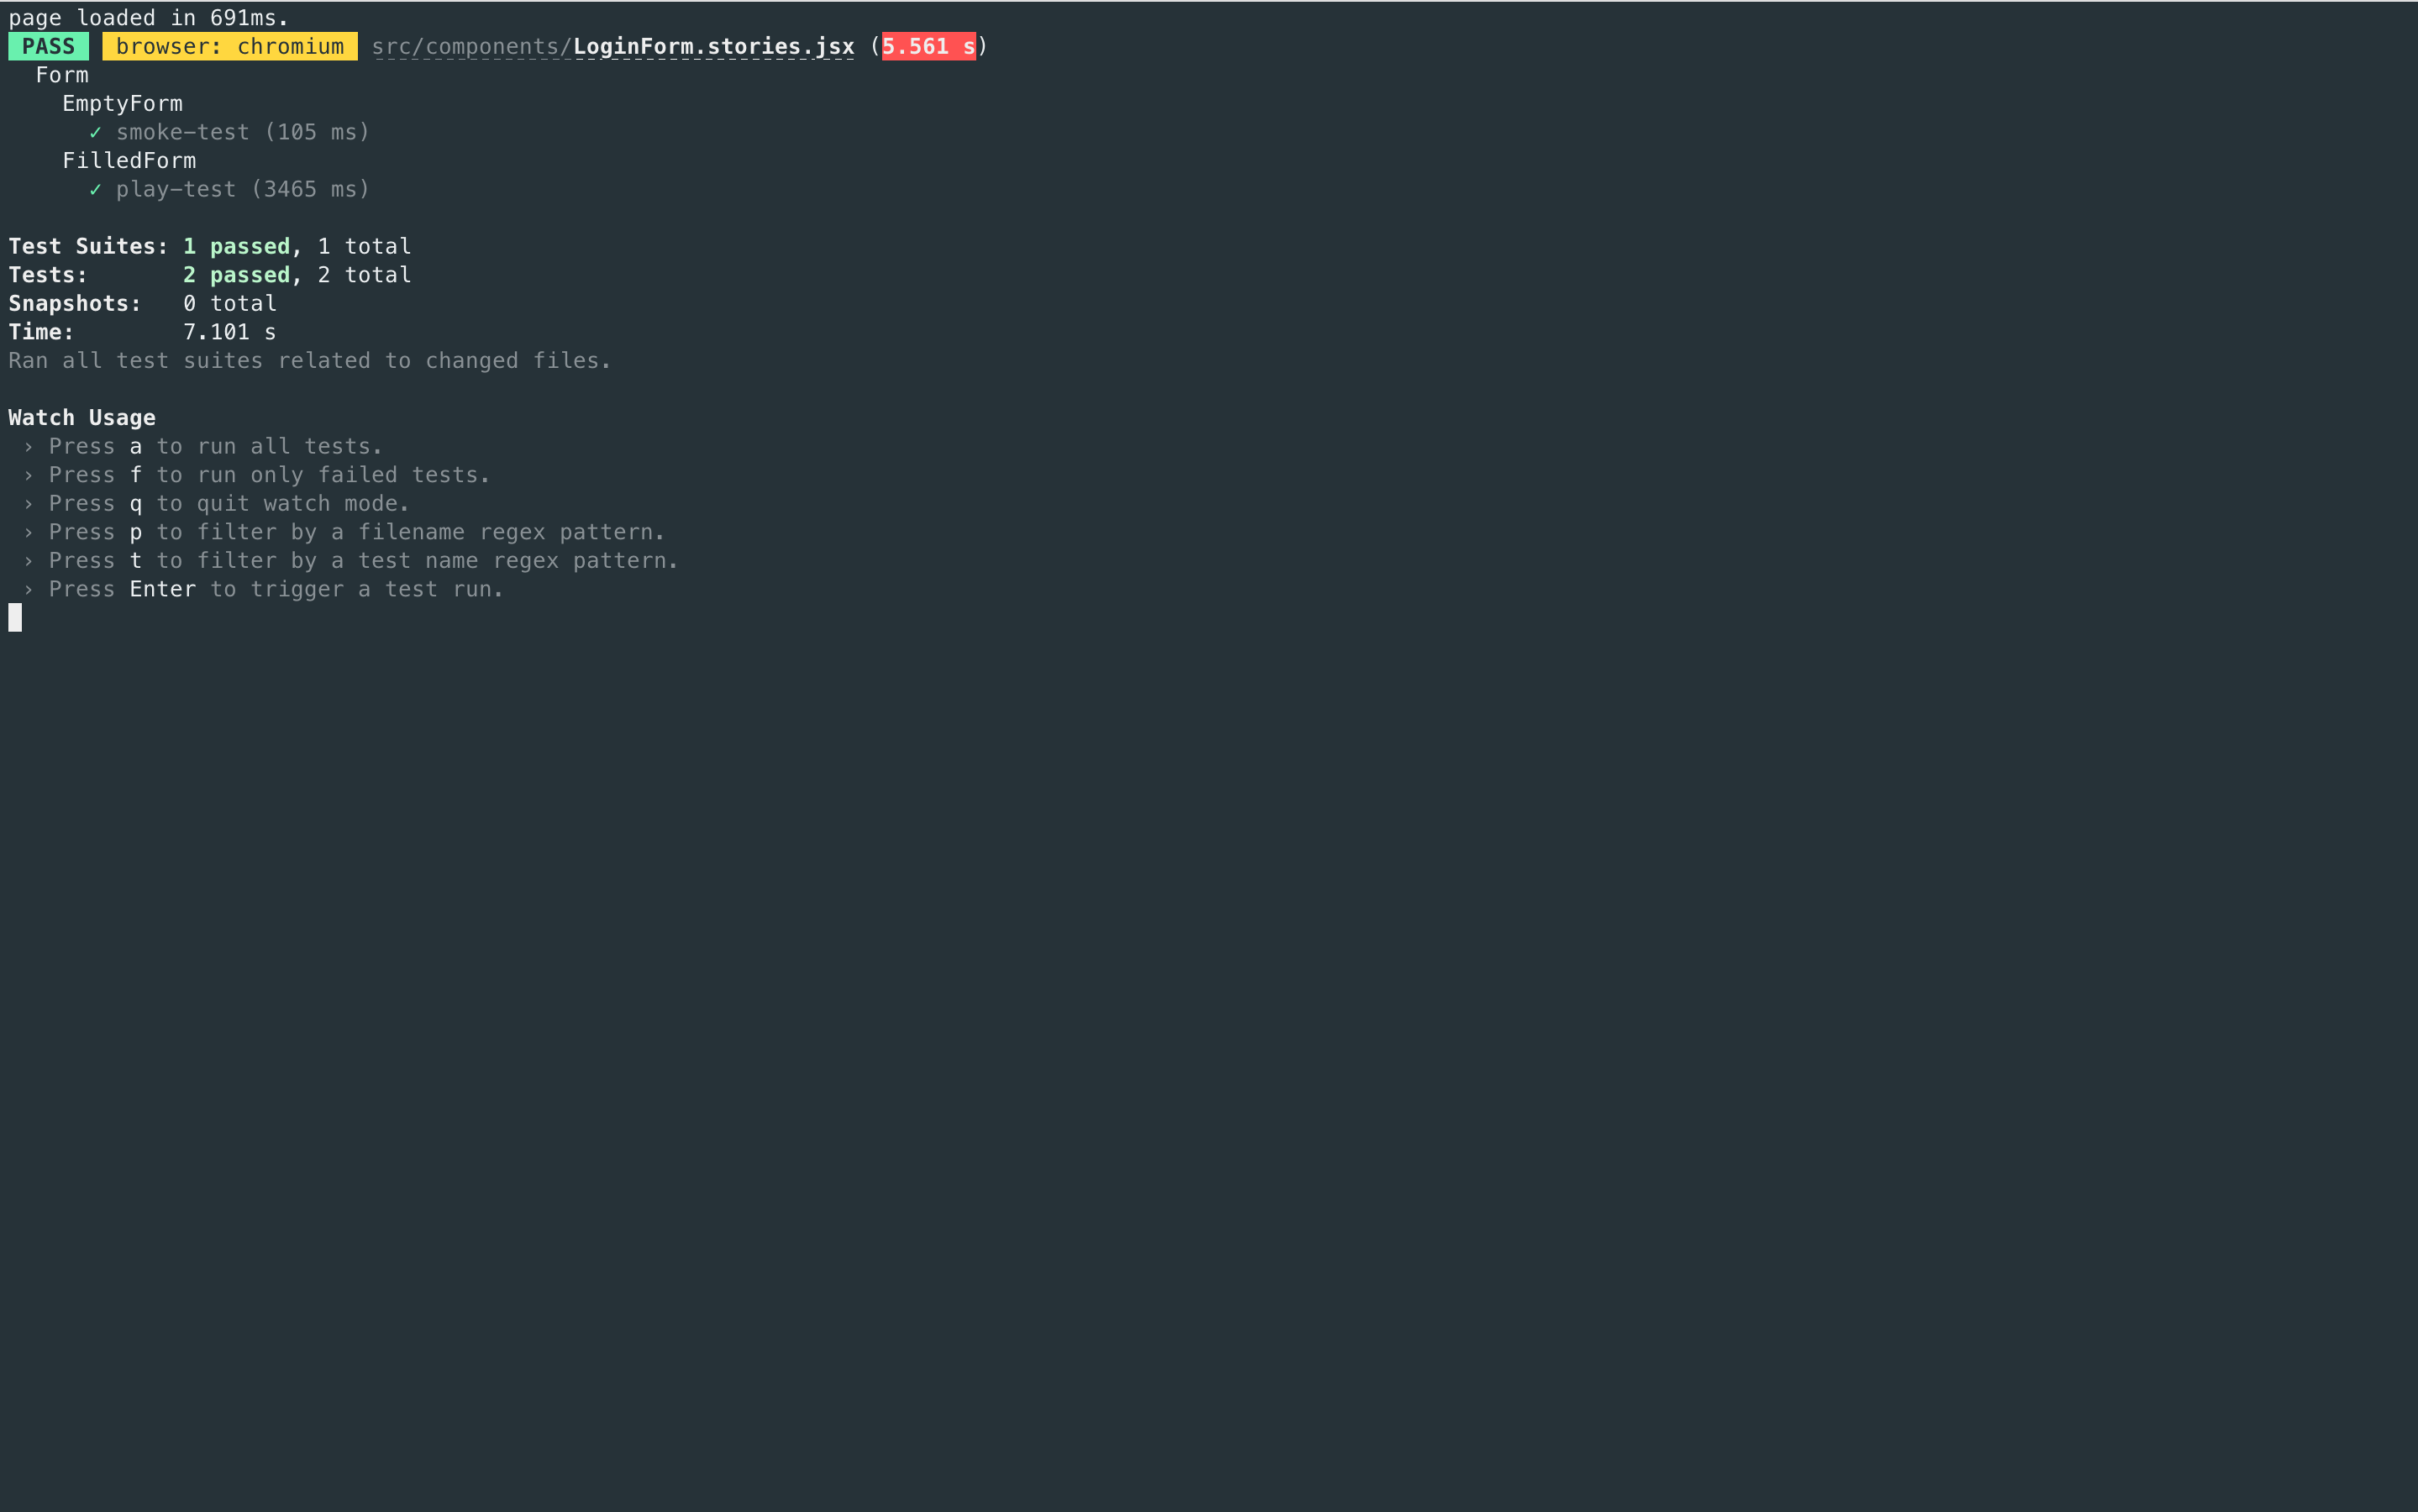
如果需要,您可以為測試執行器提供其他標誌。請閱讀文件以了解更多資訊。
自動化
當您準備好將程式碼推送到提取請求時,您需要在使用持續整合 (CI) 服務合併之前,自動執行所有檢查。請閱讀我們的文件,以取得設定 CI 環境來執行測試的詳細指南。
疑難排解
元件測試和視覺測試有何不同?
當元件測試全面應用於每個元件時,維護成本可能很高。我們建議將它們與視覺測試等其他方法結合使用,以在減少維護工作的情況下實現全面的涵蓋範圍。
元件測試與單獨使用 Jest + Testing Library 有何不同?
元件測試將 Jest 和 Testing Library 整合到 Storybook 中。最大的好處是能夠在真實瀏覽器中檢視您正在測試的元件。這有助於您在視覺上進行除錯,而不是在命令列中取得(虛假的)DOM 的轉儲,或達到 JSDOM 如何模擬瀏覽器功能的限制。將 Story 和測試保存在一個檔案中,而不是分散在多個檔案中,也更方便。
了解其他 UI 測試