
無障礙測試
觀看教學影片
無障礙性是一種讓網站對所有人更具包容性的實踐。這表示支援以下需求,例如:鍵盤導航、螢幕閱讀器支援、觸控友善、可用的色彩對比、降低動態效果和縮放支援。
無障礙測試會根據 WCAG 規則和其他業界認可的最佳實務,稽核渲染的 DOM 是否符合一組啟發法。它們作為 QA 的第一道防線,以捕捉明顯的無障礙違規行為。
使用 a11y 擴充功能進行無障礙檢查
Storybook 提供官方的 a11y 擴充功能。由 Deque 的 axe-core 驅動,自動捕捉高達 57% 的 WCAG 問題。
設定 a11y 擴充功能
如果您想使用 擴充功能 檢查 Stories 的無障礙性,您需要將其新增至您的 Storybook。您可以執行以下命令來完成此操作
npx storybook add @storybook/addon-a11y啟動您的 Storybook,您將在 UI 中看到一些明顯的差異。一個新的工具列圖示和無障礙面板,您可以在其中檢查測試結果。
運作方式
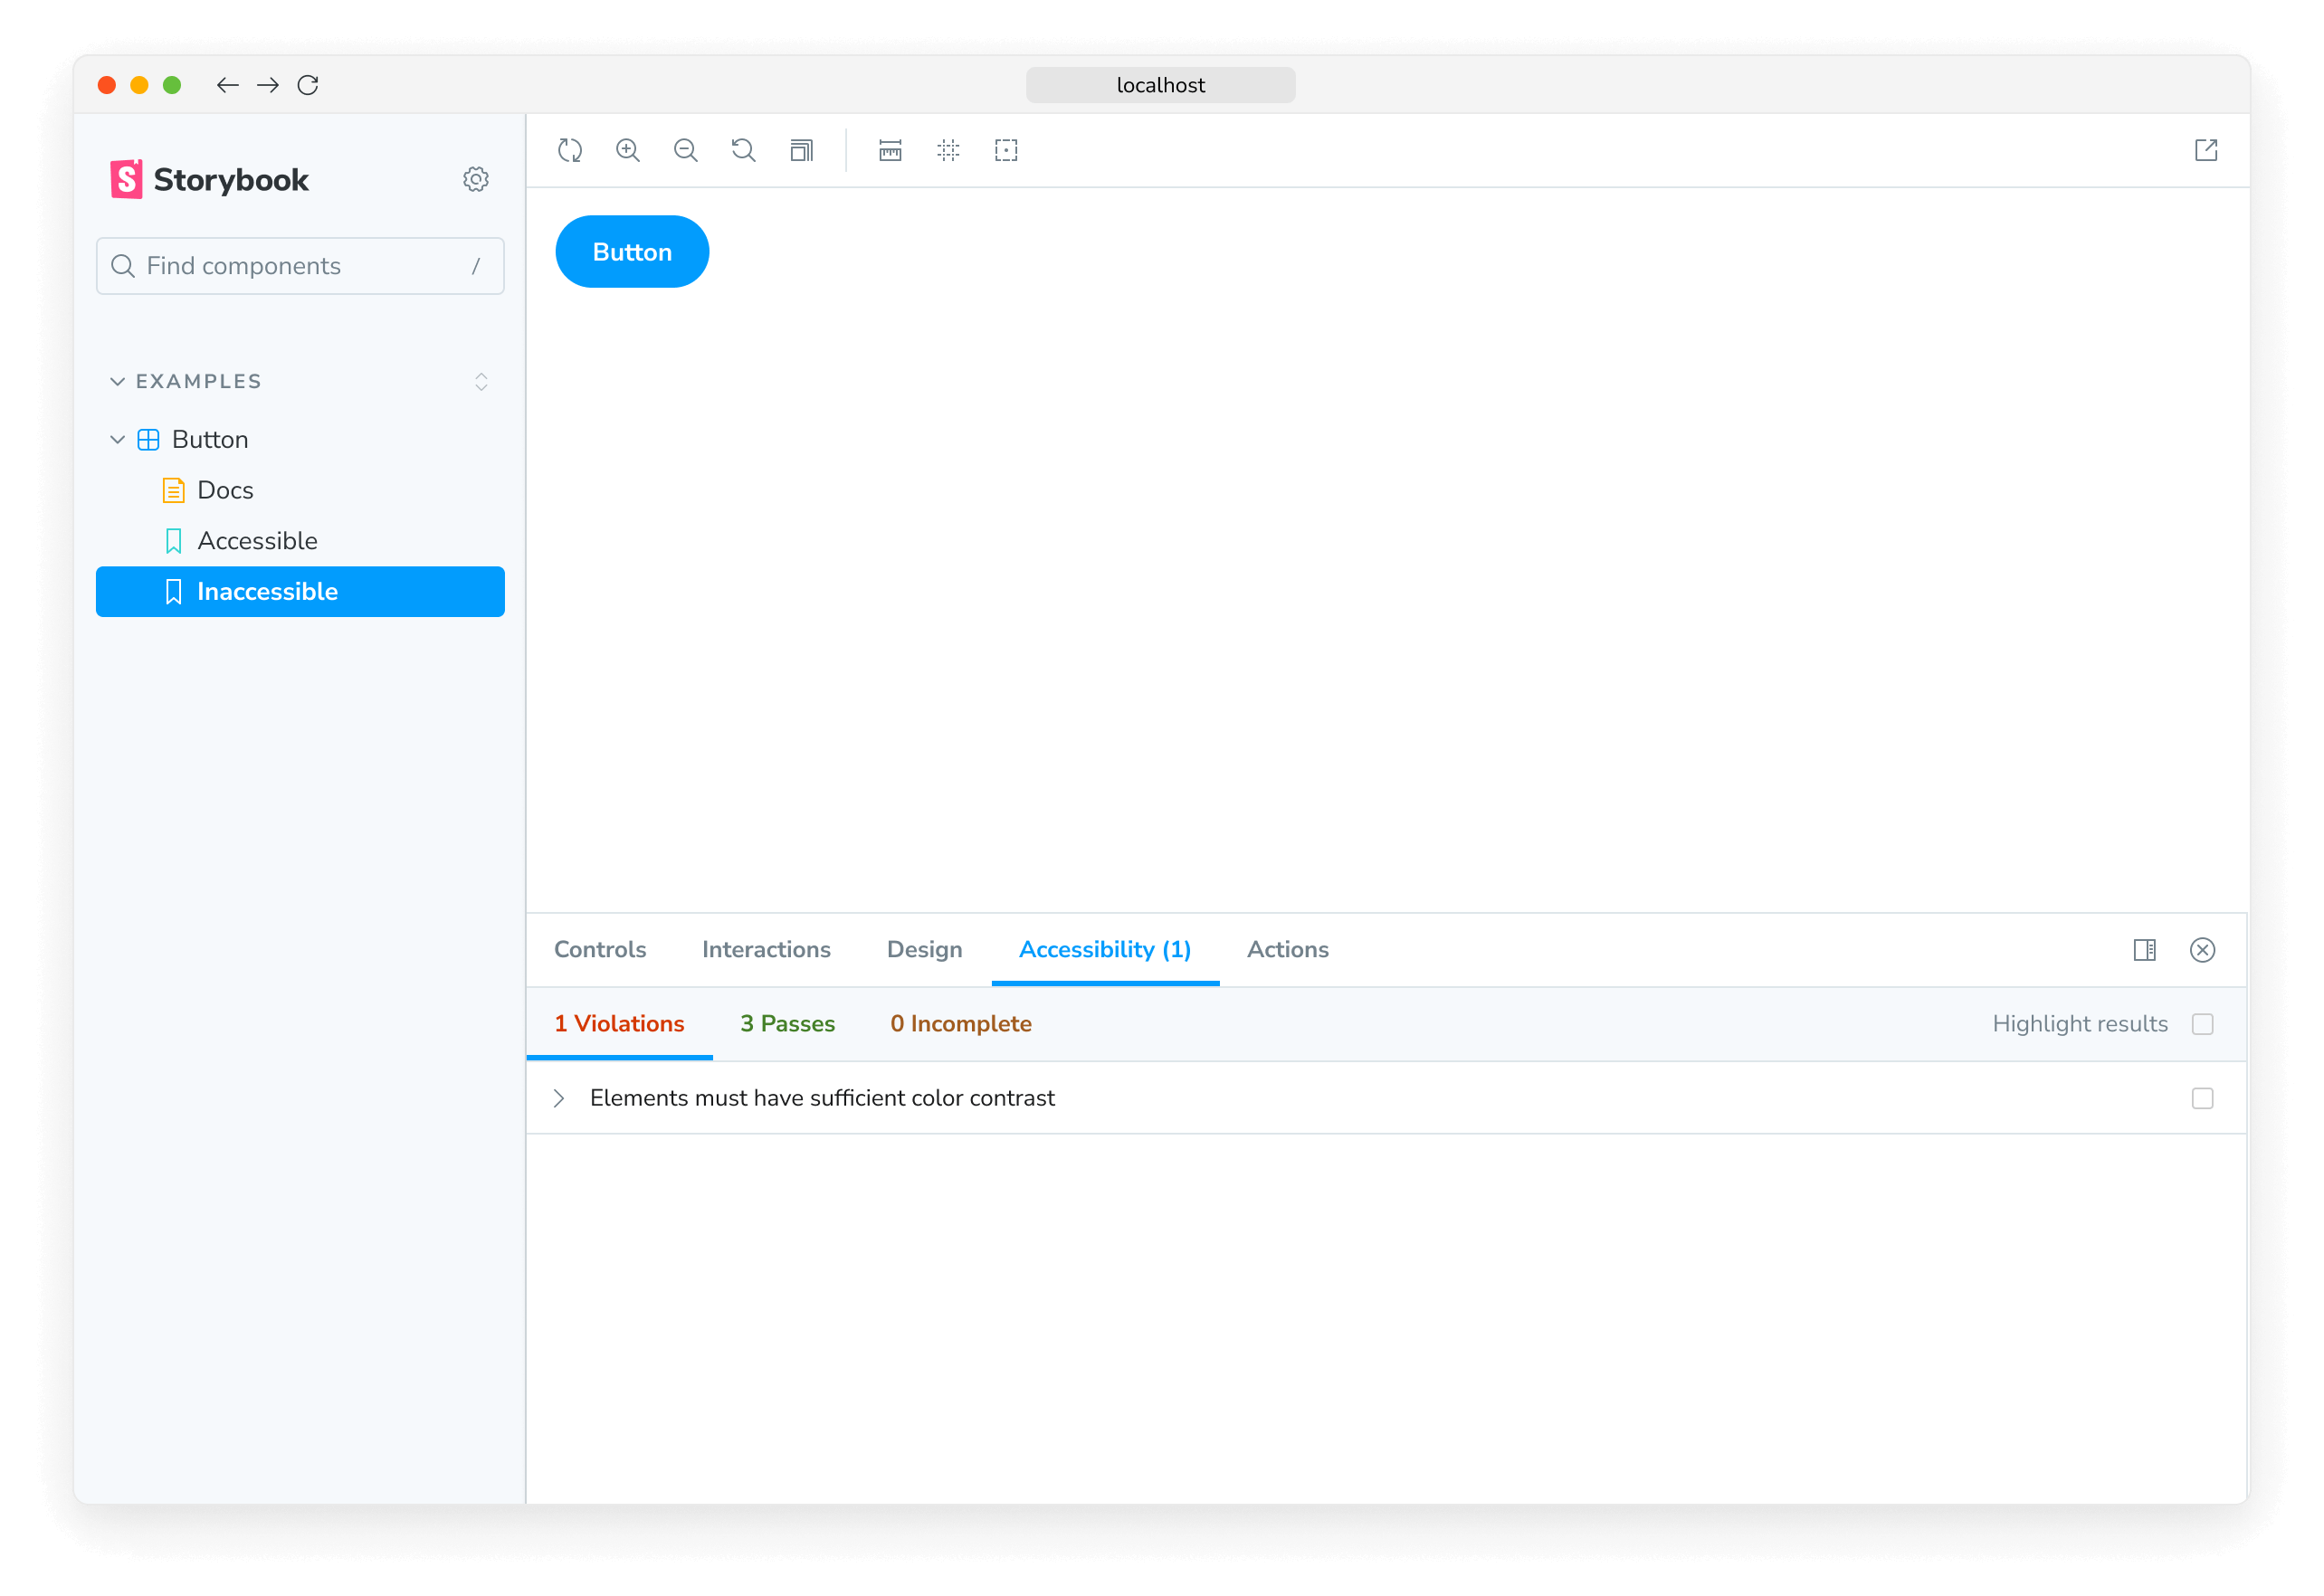
Storybook 的 a11y 擴充功能在選定的 Story 上執行 Axe。讓您在開發期間捕捉並修正無障礙問題。例如,如果您正在開發按鈕元件,並包含以下 Story 組合
import type { Meta, StoryObj } from '@storybook/react';

import { Button } from './Button';

const meta: Meta<typeof Button> = {
  component: Button,
  argTypes: {
    backgroundColor: { control: 'color' },
  },
};

export default meta;
type Story = StoryObj<typeof Button>;

// This is an accessible story
export const Accessible: Story = {
  args: {
    primary: false,
    label: 'Button',
  },
};

// This is not
export const Inaccessible: Story = {
  args: {
    ...Accessible.args,
    backgroundColor: 'red',
  },
};
瀏覽這兩個 Stories,您會看到 Inaccessible Story 包含一些需要修正的問題。開啟無障礙面板中的違規事項標籤,會清楚描述無障礙問題和解決方案指南。
設定
Storybook 的無障礙擴充功能開箱即用,包含一組涵蓋大多數問題的無障礙規則。您也可以微調擴充功能設定,或覆寫 Axe 的規則集,以最符合您的需求。
全域 a11y 設定
如果您需要關閉無障礙規則或修改其在所有 Stories 中的設定,您可以將以下內容新增至您的 storybook/preview.js|ts
// Replace your-framework with the framework you are using (e.g., react, vue3)
import { Preview } from '@storybook/your-framework';

const preview: Preview = {
  parameters: {
    a11y: {
      // Optional selector to inspect
      element: 'body',
      config: {
        rules: [
          {
            // The autocomplete rule will not run based on the CSS selector provided
            id: 'autocomplete-valid',
            selector: '*:not([autocomplete="nope"])',
          },
          {
            // Setting the enabled option to false will disable checks for this particular rule on all stories.
            id: 'image-alt',
            enabled: false,
          },
        ],
      },
      /*
       * Axe's options parameter
       * See https://github.com/dequelabs/axe-core/blob/develop/doc/API.md#options-parameter
       * to learn more about the available options.
       */
      options: {},
    },
  },
  globals: {
    a11y: {
      // Optional flag to prevent the automatic check
      manual: true,
    },
  },
};

export default preview;
元件層級 a11y 設定
您也可以為元件的所有 Stories 自訂您自己的規則集。更新 Story 檔案的預設匯出,並新增具有所需設定的 parameters 和 globals
// Replace your-framework with the name of your framework
import type { Meta } from '@storybook/your-framework';

import { MyComponent } from './MyComponent';

const meta: Meta<typeof MyComponent> = {
  component: MyComponent,
  parameters: {
    a11y: {
      // Optional selector to inspect
      element: 'body',
      config: {
        rules: [
          {
            // The autocomplete rule will not run based on the CSS selector provided
            id: 'autocomplete-valid',
            selector: '*:not([autocomplete="nope"])',
          },
          {
            // Setting the enabled option to false will disable checks for this particular rule on all stories.
            id: 'image-alt',
            enabled: false,
          },
        ],
      },
      /*
       * Axe's options parameter
       * See https://github.com/dequelabs/axe-core/blob/develop/doc/API.md#options-parameter
       * to learn more about the available options.
       */
      options: {},
    },
  },
  globals: {
    a11y: {
      manual: true,
    },
  },
};

export default meta;
Story 層級 a11y 設定
透過更新您的 Story 以包含新的參數,來自訂 Story 層級的 a11y 規則集
import type { Meta, StoryObj } from '@storybook/react';

import { MyComponent } from './MyComponent';

const meta: Meta<typeof MyComponent> = {
  component: MyComponent,
};

export default meta;
type Story = StoryObj<typeof MyComponent>;

export const ExampleStory: Story = {
  parameters: {
    a11y: {
      element: 'body',
      config: {
        rules: [
          {
            // The autocomplete rule will not run based on the CSS selector provided
            id: 'autocomplete-valid',
            selector: '*:not([autocomplete="nope"])',
          },
          {
            // Setting the enabled option to false will disable checks for this particular rule on all stories.
            id: 'image-alt',
            enabled: false,
          },
        ],
      },
      /*
       * Axe's options parameter
       * See https://github.com/dequelabs/axe-core/blob/develop/doc/API.md#options-parameter
       * to learn more about the available options.
       */
      options: {},
    },
  },
  globals: {
    a11y: {
      // Optional flag to prevent the automatic check
      manual: true,
    },
  },
};
關閉自動化 a11y 測試
透過將以下 globals 新增至您的 Story 匯出或元件的預設匯出,來停用 Stories 或元件的自動化無障礙測試
import type { Meta, StoryObj } from '@storybook/react';

import { MyComponent } from './MyComponent';

const meta: Meta<typeof MyComponent> = {
  component: MyComponent,
};

export default meta;
type Story = StoryObj<typeof MyComponent>;

export const NonA11yStory: Story = {
  globals: {
    a11y: {
      // This option disables all automatic a11y checks on this story
      manual: true,
    },
  },
};
測試擴充功能整合
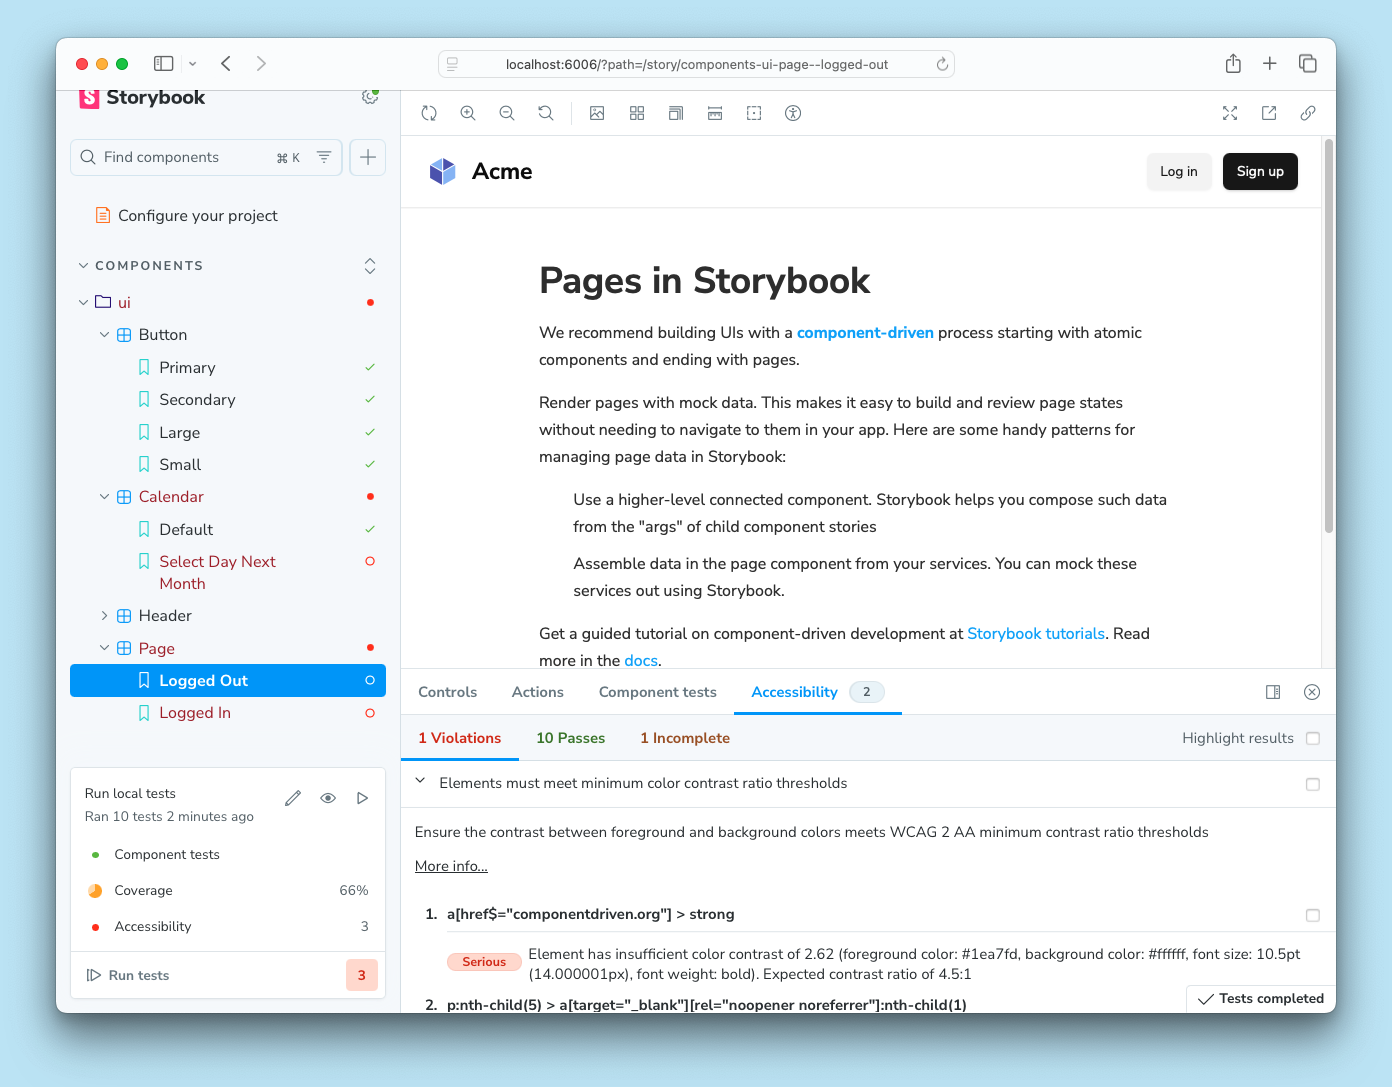
無障礙擴充功能與 測試擴充功能 提供無縫整合,讓您在背景執行所有測試的自動化無障礙測試,同時執行元件測試。如果發生任何違規事項,測試將會失敗,您將在側邊欄中看到結果,而無需任何額外設定。
手動升級
如果您已啟用擴充功能,且您要手動升級至 Storybook 8.5 或更新版本,您需要調整現有的設定(即 .storybook/vitest.setup.ts),以啟用整合,如下所示
import { beforeAll } from 'vitest';

import { setProjectAnnotations } from '@storybook/react';

// Import the a11y addon annotations
import * as a11yAddonAnnotations from '@storybook/addon-a11y/preview';

// Optionally import your own annotations
import * as projectAnnotations from './preview';

const project = setProjectAnnotations([
  // Add the a11y addon annotations
  a11yAddonAnnotations,
  projectAnnotations,
]);

beforeAll(project.beforeAll);
使用測試擴充功能設定無障礙測試
您可以使用 parameters.a11y.test 參數 設定無障礙測試,這會決定 Story 的無障礙測試行為,並接受以下值
| 值 | 描述 |
|---|---|
'off' | 不執行無障礙測試(您仍然可以透過擴充功能面板手動驗證) |
'todo' | 執行無障礙測試;違規事項會在 Storybook UI 中傳回警告,並在 CLI/CI 中傳回摘要計數 |
'error' | 執行無障礙測試;違規事項會在 Storybook UI 和 CLI/CI 中傳回失敗的測試 |
與其他參數一樣,您可以在專案層級的 .storybook/preview.js|ts、Story 檔案預設匯出的元件層級或個別 Story 層級中定義它。例如,針對檔案中的所有 Stories(除了其中一個)在無障礙測試失敗時
// Replace your-renderer with the renderer you are using (e.g., react, vue3)
import { Meta, StoryObj } from '@storybook/your-renderer';

import { Button } from './Button';

const meta: Meta<typeof Button> = {
  component: Button,
  parameters: {
    a11y: { test: 'error' },
  },
};
export default meta;

type Story = StoryObj<typeof Button>;

// 👇 This story will use the 'error' value and fail on accessibility violations
export const Primary: Story = {
  args: { primary: true },
};

// 👇 This story will not fail on accessibility violations
//    (but will still run the tests and show warnings)
export const NoA11yFail: Story = {
  parameters: {
    a11y: { test: 'todo' },
  },
};為何值稱為 "todo" 而不是 "warn"?此值旨在作為程式碼庫中的文字 TODO。它可用於標記您知道有無障礙問題但尚未準備好修正的 Stories。如此一來,您可以追蹤它們並稍後處理。
'off' 值應僅用於不需要測試無障礙性的 Stories,例如用於示範元件使用方式中的反模式的 Story。
您也可以在不適用於您的使用案例時,停用個別規則。
建議的工作流程
您可以使用設定,透過結合多種測試行為,逐步達成更易於存取的 UI。例如,您可以從 'error' 開始,在發生無障礙違規時失敗,然後切換至 'todo' 以標記需要修正的元件,最後在所有 Stories 通過無障礙測試後移除 todos
-
更新您的專案設定,以在發生無障礙違規時失敗,方法是將
parameters.a11y.test設定為'error'。這可確保所有新的 Stories 都經過測試,以符合無障礙標準。.storybook/preview.ts// Replace your-renderer with the renderer you are using (e.g., react, vue3) import { Preview } from '@storybook/your-renderer'; const preview: Preview = { // ... parameters: { // 👇 Fail all accessibility tests when violations are found a11y: { test: 'error' }, }, }; export default preview; -
您可能會發現許多元件都有無障礙失敗(並且可能感到有點不知所措!)。
-
記下有無障礙問題的元件,並暫時將其失敗降為警告,方法是套用
'todo'參數值。這可讓無障礙問題保持可見,同時不會阻礙開發。這也是將您的工作作為未來改進基準的好時機。DataTable.stories.ts// Replace your-renderer with the renderer you are using (e.g., react, vue3) import { Meta } from '@storybook/your-renderer'; import { DataTable } from './DataTable'; const meta: Meta<typeof DataTable> = { component: DataTable, parameters: { // 👇 This component's accessibility tests will not fail // Instead, they display warnings in the Storybook UI a11y: { test: 'todo' }, }, }; export default meta; -
從您剛標記為
'todo'的元件中挑選一個好的起點(我們建議類似 Button 的元件,因為其簡單性和可能在其他元件中使用的可能性)。使用擴充功能面板中的建議修正該元件中的問題,以確保其通過無障礙測試,然後移除參數。Button.stories.ts// Replace your-renderer with the renderer you are using (e.g., react, vue3) import { Meta } from '@storybook/your-renderer'; import { Button } from './Button'; const meta: Meta<typeof Button> = { component: Button, parameters: { // 👇 Remove this once all stories pass accessibility tests // a11y: { test: 'todo' }, }, }; export default meta; -
挑選另一個元件並重複此程序,直到您涵蓋所有元件,並且您成為無障礙英雄!
使用測試執行器自動化無障礙測試
檢查無障礙性的最準確方法是在真實裝置上手動進行。但是,您可以使用自動化工具來捕捉常見的無障礙問題。例如,Axe 平均自動捕捉高達 57% 的 WCAG 問題。
這些工具的運作方式是根據 WCAG 規則和其他業界認可的最佳實務,稽核渲染的 DOM 是否符合啟發法。然後,您可以使用 Storybook 測試執行器 和 axe-playwright,將這些工具整合到您的測試自動化管線中。
設定
若要使用測試執行器啟用無障礙測試,您需要採取其他步驟來正確設定它。我們建議您先閱讀 測試執行器文件,然後再繼續進行其餘的必要設定。
執行以下命令以安裝必要的依賴項目。
npm install axe-playwright --save-dev在您的 Storybook 目錄內新增一個新的 設定檔,並在其中加入以下內容
import type { TestRunnerConfig } from '@storybook/test-runner';
import { injectAxe, checkA11y } from 'axe-playwright';

/*
 * See https://storybook.dev.org.tw/docs/writing-tests/test-runner#test-hook-api
 * to learn more about the test-runner hooks API.
 */
const config: TestRunnerConfig = {
  async preVisit(page) {
    await injectAxe(page);
  },
  async postVisit(page) {
    await checkA11y(page, 'body', {
      detailedReport: true,
      detailedReportOptions: {
        html: true,
      },
    });
  },
};

export default config;preVisit 和 postVisit 是方便的 Hook,可讓您擴充測試執行器的預設設定。在此處閱讀有關它們的更多資訊 這裡。
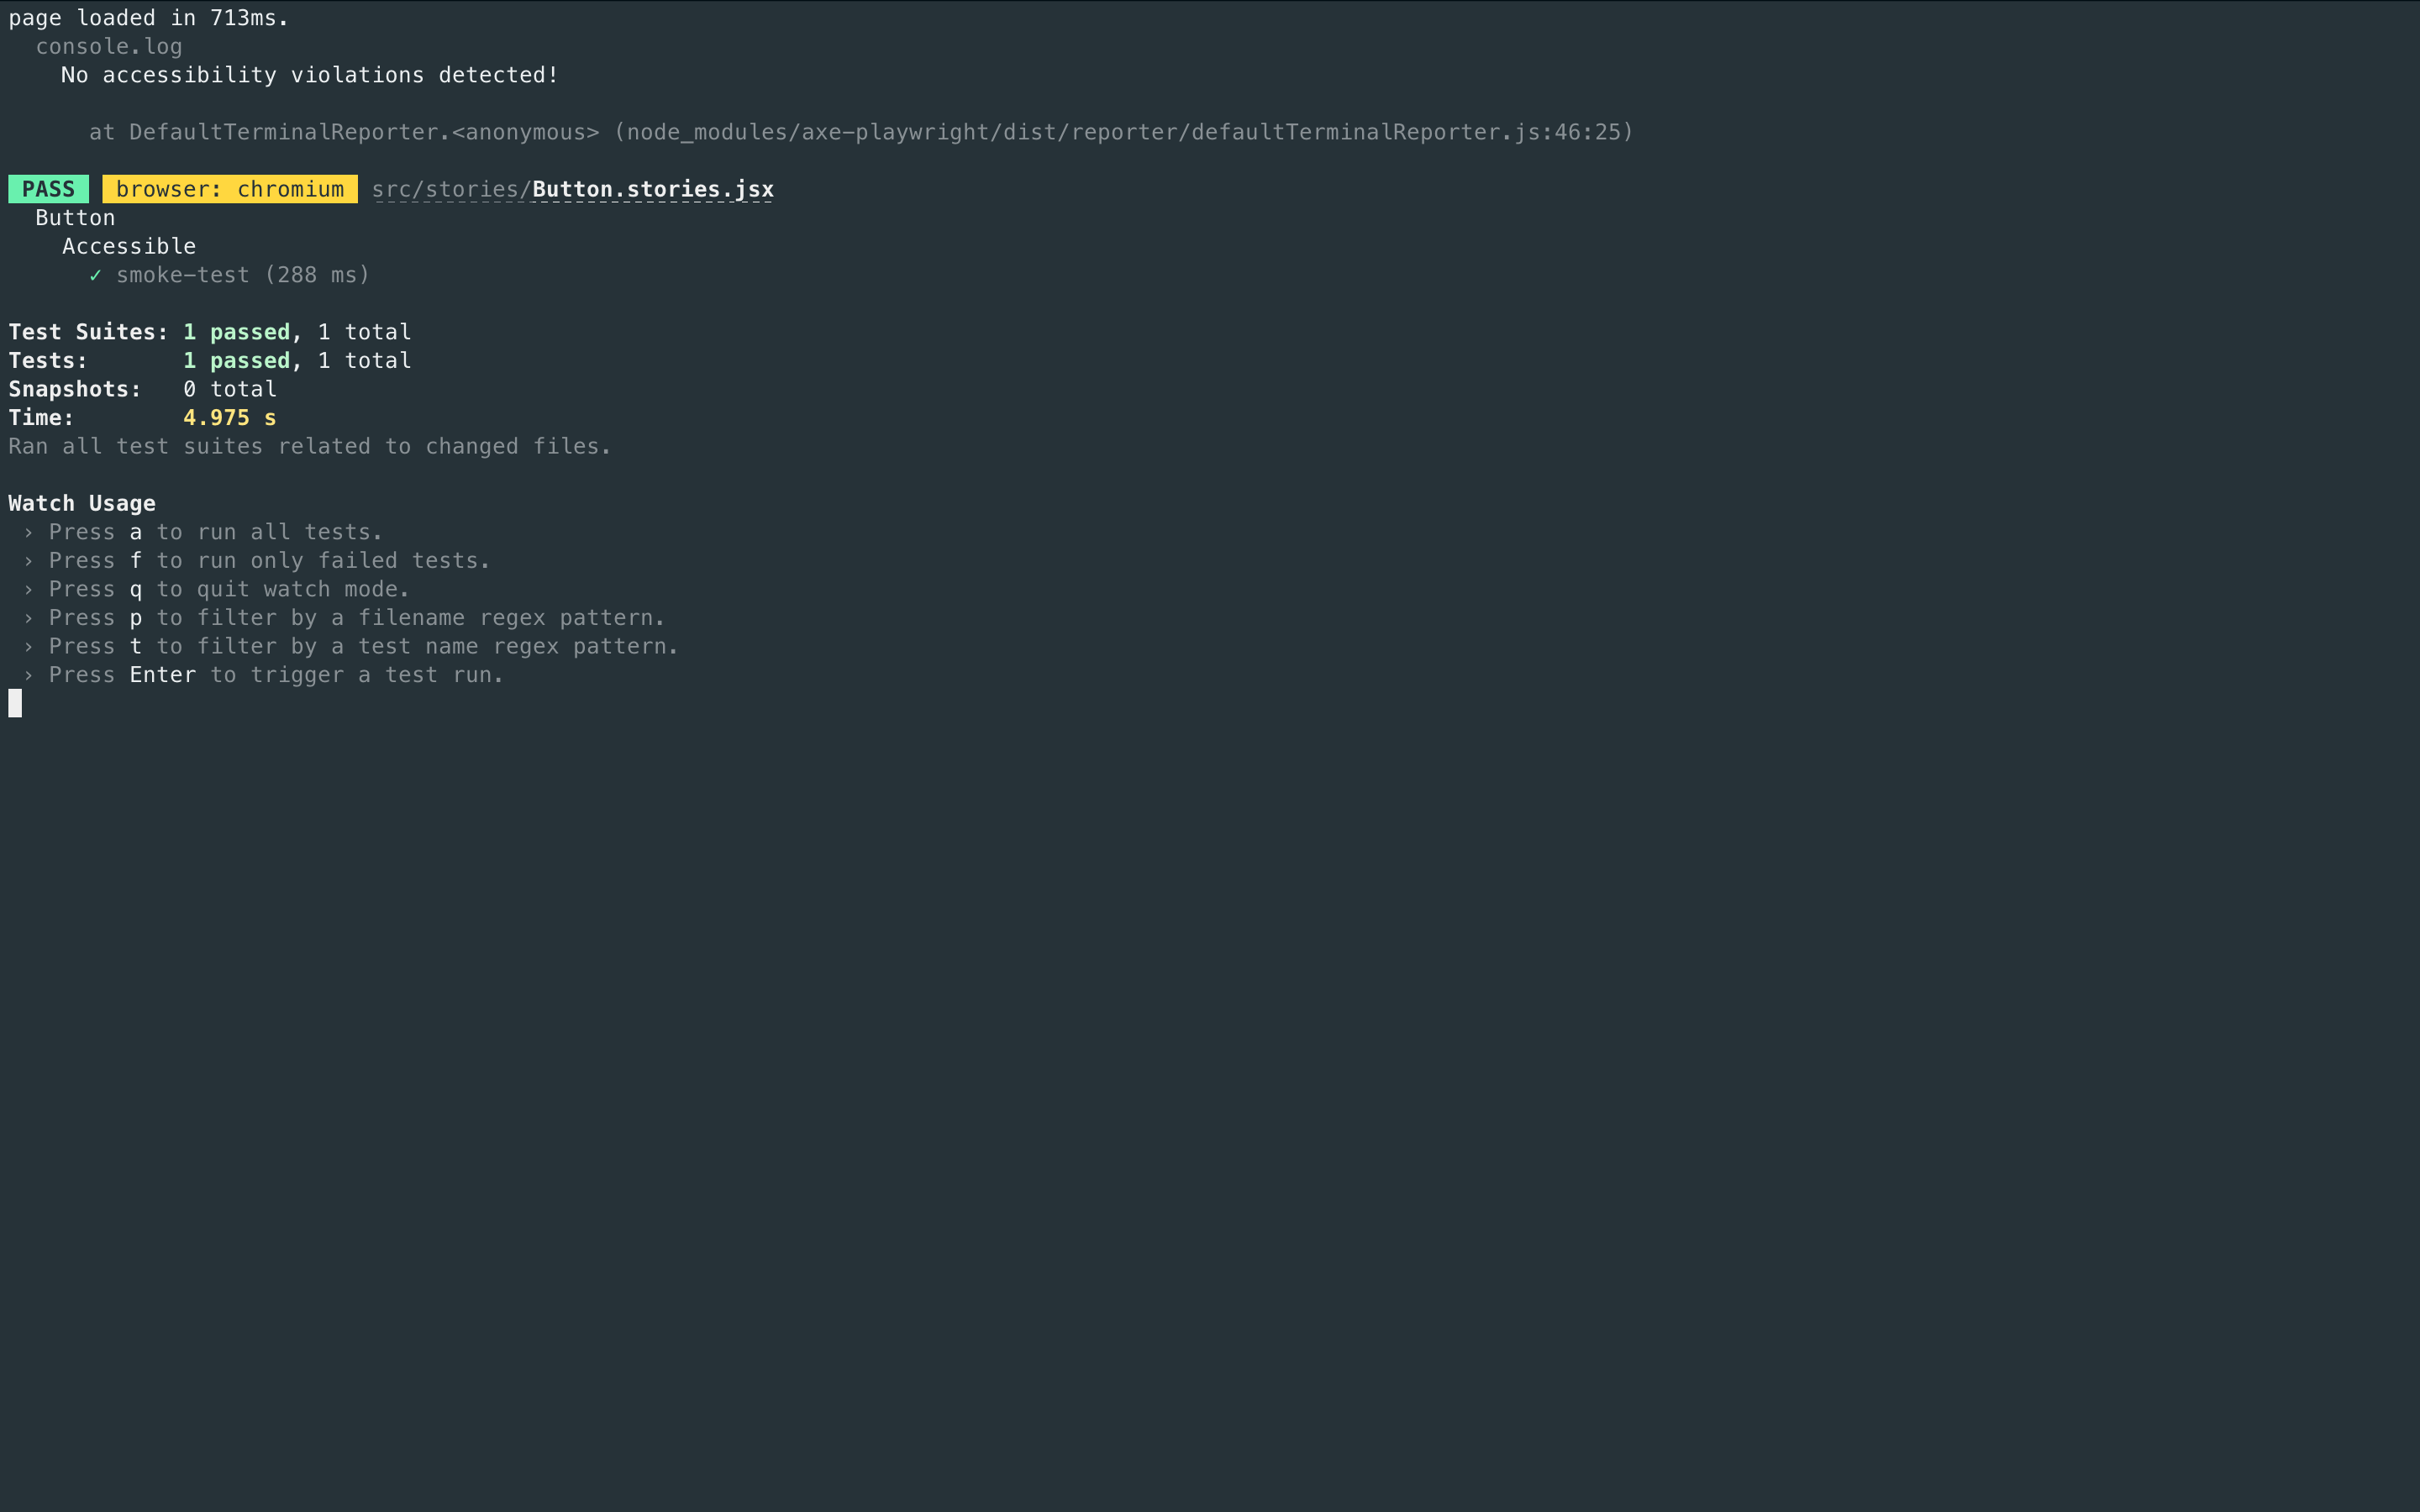
當您執行測試執行器時(例如,使用 yarn test-storybook),它將執行無障礙稽核以及您可能已為每個元件 Story 設定的任何 元件測試。
它會從 Story 的根元素開始遍歷 DOM 樹狀結構,以開始檢查問題,並根據遇到的問題產生詳細報告。
測試執行器的 A11y 設定
測試執行器提供 helper 方法,可讓您存取 Story 的資訊。您可以使用它們來擴充測試執行器的設定,並為特定 Story 提供您可能擁有的其他選項。例如
import type { TestRunnerConfig } from '@storybook/test-runner';
import { getStoryContext } from '@storybook/test-runner';

import { injectAxe, checkA11y, configureAxe } from 'axe-playwright';

/*
 * See https://storybook.dev.org.tw/docs/writing-tests/test-runner#test-hook-api
 * to learn more about the test-runner hooks API.
 */
const config: TestRunnerConfig = {
  async preVisit(page) {
    await injectAxe(page);
  },
  async postVisit(page, context) {
    // Get the entire context of a story, including parameters, args, argTypes, etc.
    const storyContext = await getStoryContext(page, context);

    // Apply story-level a11y rules
    await configureAxe(page, {
      rules: storyContext.parameters?.a11y?.config?.rules,
    });

    const element = storyContext.parameters?.a11y?.element ?? 'body';
    await checkA11y(page, element, {
      detailedReport: true,
      detailedReportOptions: {
        html: true,
      },
    });
  },
};

export default config;
使用測試執行器停用 a11y 測試
此外,如果您已為任何特定 Story 停用無障礙 測試,您也可以設定測試執行器以避免測試它。例如
import type { TestRunnerConfig } from '@storybook/test-runner';
import { getStoryContext } from '@storybook/test-runner';

import { injectAxe, checkA11y } from 'axe-playwright';

/*
 * See https://storybook.dev.org.tw/docs/writing-tests/test-runner#test-hook-api
 * to learn more about the test-runner hooks API.
 */
const config: TestRunnerConfig = {
  async preVisit(page) {
    await injectAxe(page);
  },
  async postVisit(page, context) {
    // Get the entire context of a story, including parameters, args, argTypes, etc.
    const storyContext = await getStoryContext(page, context);

    // Do not run a11y tests on disabled stories.
    if (storyContext.parameters?.a11y?.disable) {
      return;
    }
    await checkA11y(page, 'body', {
      detailedReport: true,
      detailedReportOptions: {
        html: true,
      },
    });
  },
};

export default config;
基於瀏覽器和基於 Linter 的無障礙測試之間有何差異?
基於瀏覽器的無障礙測試(例如 Storybook 中的測試)會評估渲染的 DOM,因為這可提供最高的準確性。稽核尚未編譯的程式碼與真實情況相差一步,因此您不會捕捉到使用者可能體驗到的一切。
疑難排解
為何我的測試在不同環境中失敗?
如果您已啟用實驗性測試擴充功能(即 @storybook/experimental-addon-test),您的測試會在 Vitest 中使用您的專案設定和 Playwright 的 Chromium 瀏覽器執行。這可能會導致 Storybook UI 或 CLI 中報告的測試結果不一致。不一致的原因可能是 axe-core 在不同環境(例如瀏覽器版本或設定)中報告不同的結果。如果您遇到此問題,我們建議使用預設的溝通管道聯絡(例如,GitHub 討論、Github 問題)。
擴充功能面板未顯示預期的違規事項
現代 React 元件通常使用非同步技術,例如 Suspense 或 React 伺服器元件 (RSC),以處理複雜的資料擷取和渲染。這些元件不會立即渲染其最終 UI 狀態。Storybook 本身並不知道非同步元件何時已完全渲染。因此,a11y 檢查有時會太早執行,在元件完成渲染之前執行,導致誤報負面結果(即使存在違規事項,也沒有報告違規事項)。
為了解決此問題,我們引入了一個功能旗標:developmentModeForBuild。此功能旗標可讓您在建置的 Storybooks 中將 process.env.NODE_ENV 設定為 'development',從而啟用通常在生產建置中停用的開發相關最佳化。其中一項開發最佳化是 React 的 act 公用程式,這有助於確保在進行判斷提示(例如 a11y 檢查)之前,處理和套用與測試相關的所有更新。
若要啟用此功能旗標,請將以下設定新增至您的 .storybook/main.js|ts 檔案
// Replace your-framework with the framework you are using (e.g., react-webpack5, vue3-vite)
import type { StorybookConfig } from '@storybook/your-framework';

const config: StorybookConfig = {
  framework: '@storybook/your-framework',
  stories: ['../src/**/*.mdx', '../src/**/*.stories.@(js|jsx|mjs|ts|tsx)'],
  features: {
    developmentModeForBuild: true,
  },
};

export default config;
瞭解其他 UI 測試